Homesteading In The Pacific Northwest

Thursday, June 28, 2012

FitzGyver To The Rescue!

It's that time of year in Washington ... sun ... clouds ... sun ... rain ... sun ... clouds ... (of course that's actually most of the time in Washington except when it's clouds ... rain ... clouds ... rain ...clouds).  It was really making it hard to keep the temperature in the greenhouse consistent.  The greenhouse kit came with a shade cloth but trying to get it on and off, especially for someone like me who who is a little bit "height challenged" was a problem ... FitzGyver to the rescue ...


Pull the ropes ... shade cloth comes down ...


... turn the wheel ...


... shade cloth goes up.

Thanks FitzGyver!

Enjoy!


Wednesday, June 27, 2012

Strawberries!

Strawberry season in Washington State is short and sweet.  Very sweet :)  The start of strawberry season pretty much coincides with the the Summer Solstice; June 21 (I'd say the start of summer but everyone knows that summer in Washington doesn't arrive until July 12.  You did know that, didn't you?).  So about June 18th or so I start asking my "Local Guy" ... "Are the ready yet?"  Last week I asked on Wednesday and he told me "They'll be here Friday" ... YES!!  I now have 4 flats frozen and another 2 turned in "Food of the Gods" ... Strawberry Vanilla Jam ...

I first found this recipe on "Food In Jars" last spring and adapted it just a bit ...


Ingredients:

8 cups strawberries, halved
4 cups cane sugar
3 vanilla beans
juice and zest of 1/4 lemon

Split the vanilla beans and scrape out the seeds ...


Place the vanilla beans and seeds, the strawberries and 2 cups of the sugar in a zip lock bag
 and allow to macerate overnight.


Hint: prepare several bags, allow them to sit overnight, process one into jam and freeze the rest ... all ready to be processed into jam at a later date ...


The next day place the contents of the bag and the remaining sugar in a heavy bottomed pot and cook over medium high heat until it reaches 220 degrees/gel stage, stirring often ... this will take 2 to 3 hours ... remember "Patience is a virtue."


While the jam is cooking prepare 6 to 8 half pint jars, lids and rings for canning ... I usually end up with 6 full half pints that I process and about 2/3 of another one that goes into the fridge ... 


Remove the vanilla beans from the pot and ladle the hot jam into the hot jars leaving 1/4 inch head space.  Add lids and rings and process in a hot water bath for 10 minutes.


Enjoy!


Sunday, June 24, 2012

In A Pickle ...

I believe that I have mentioned that I'm a relative newbie at gardening.  I certainly proved it last week!  My friend Carolyn was over for a joint canning extravaganza (post on that coming soon).  We were walking around looking at my garden when she noticed my cucumbers and mentioned that they were over ripe and needed to be picked.  Later I went back and looked at them and thought "no, they're all leathery and fuzzy ... I need to wait for them to get smoother...".  So I waited ... and waited ... and waited ... 
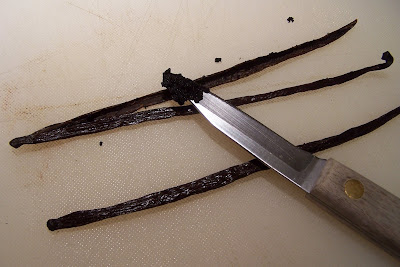
because I still didn't get it!   I thought the cucumbers went from this ...


...to this ....


When, of course, because these are a pickling cucumber, they go from this...


...to this ....


...when they are over ripe and need to be picked.  "Carolyn, I can here you snickering out there!"

So that would be why I have a whole basket full of very over ripe cucumbers that are useless for pickling! *sigh*

Thankfully my friends at a local produce shop had a whole bunch of  pickling cucumbers and were only too happy to let me buy some of them ... so now on to the recipe portion of our program ...

I've been seeing a lot of posts about fermented dill pickles on some of the cooking blogs that I follow with many different recipes and decided that I wanted to give it a try. Carol (Annie's Granny) shared a recipe with me after I asked about pickling.  I used the technique in the recipe Carol sent me with a few variations of my own and made up my own recipe for the pickling spice...


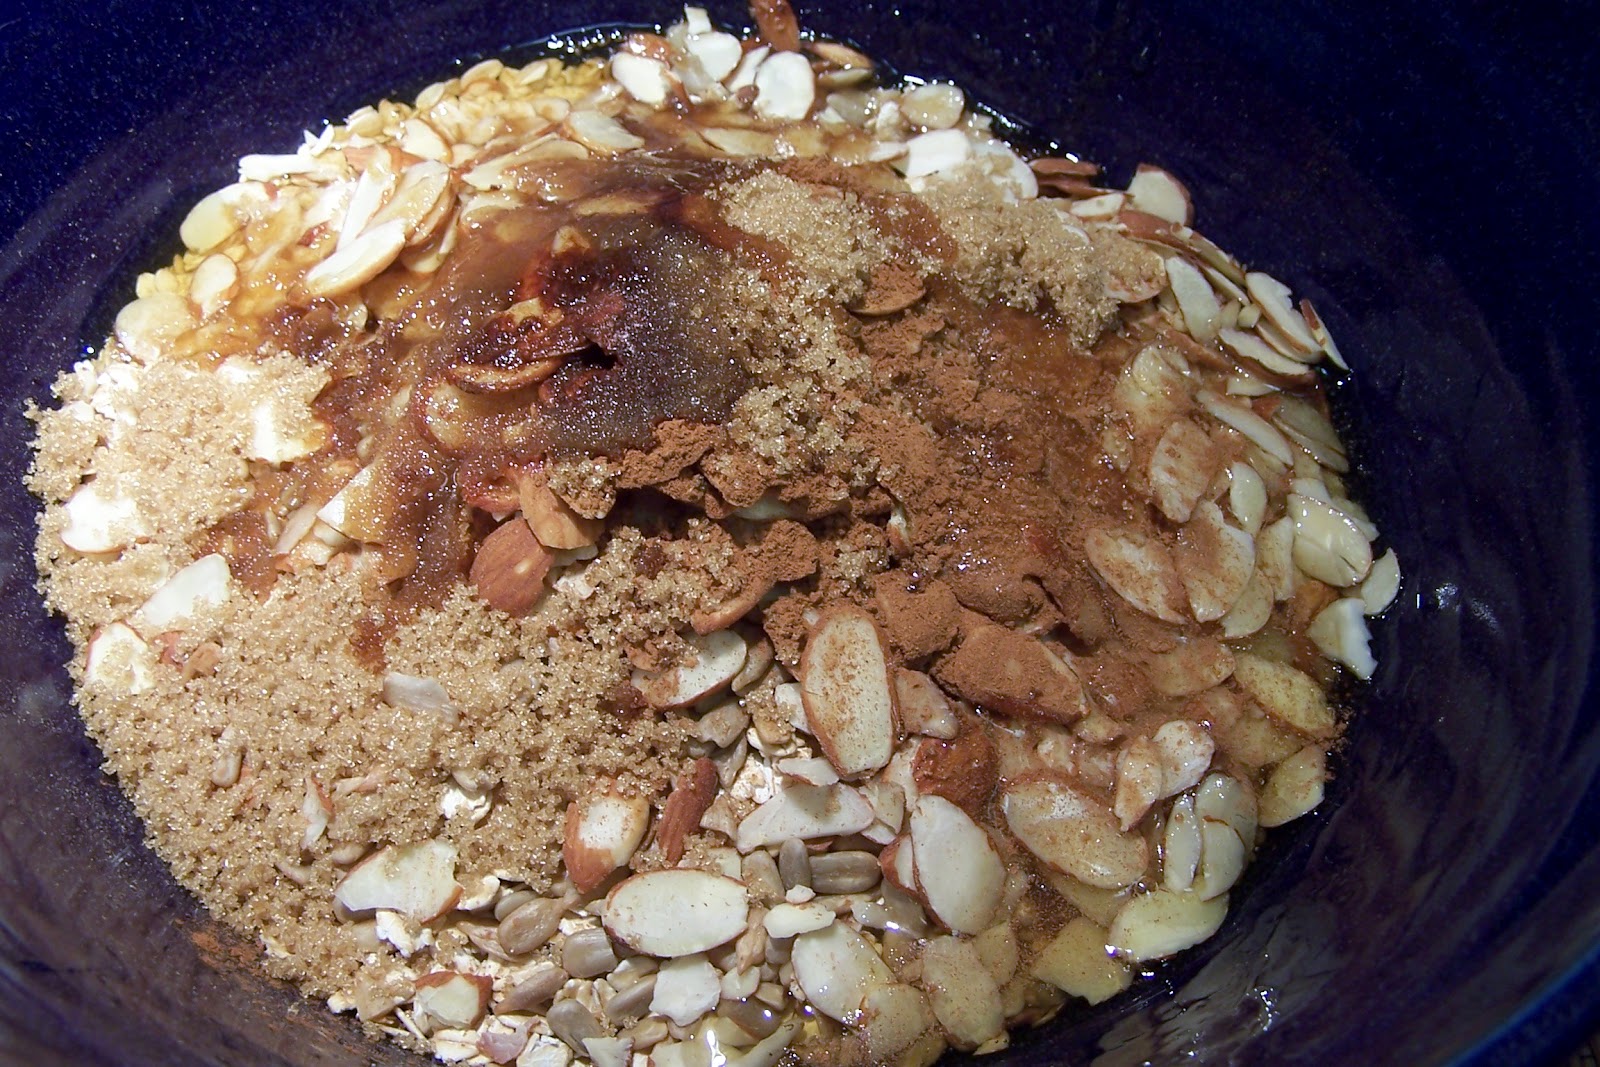
Spice Blend for Dill Pickles

1/2 cup  brown or yellow mustard seeds (I used a combination of both)
1/4 cup coriander seeds
1/4 cup allspice
1/4 cup peppercorns (I used rainbow peppercorns)
4 - 3" cinnamon sticks, crushed
1/4 cup dill seeds
1 tablespoon whole cloves
5 bay leaves, crumbled
1 teaspoon red pepper flakes

Combine all the ingredients and store in an airtight container.

For The Pickles:


1/4 cup pickling spice blend
1 head fresh dill
1 cup vinegar
3/4 cup sea salt
1 gallon water (chlorine free)
4 - 8 cloves garlic, peeled (optional - I used 4 since I don't like garlicky pickles)
enough pickling cucumbers to fill a crock about 3/4 full ... (preferably from your own garden, not the ones you had to buy because you didn't know the difference between a ripe and an over ripe cucumber "Quit snickering, Carolyn."


 First I put the water, salt and vinegar into a large bowl and stirred it a few times to dissolve the salt (some of the recipes say to heat it up to dissolve the salt, but the sea salt dissolves just fine without heating and I didn't have to wait for it to cool down again).  Then I put the spice blend, garlic cloves, fresh dill head and the cucumbers in the crock and poured the brine over the cucumbers.  Most of the recipes say to weight the cucumbers down with a plate in the crock to keep them submerged in the brine.  I found that this didn't work very well for me ... first try finding a plate that fits into the crock and then when I finally did find one  the cucumbers kept escaping and popping up onto the plate... so instead I weighted the cucumbers down with  a plastic freezer bag filled with the leftover brine... wish I could take credit for that idea, but I saw it here.  One thing Erica didn't mention in her post was that you should put the empty bag into the top of the crock and then slowly add brine until the cucumbers are submerged.  Don't fill the bag full of brine and then plop it into the crock or the brine in the crock might overflow and make a big mess ... "go ahead, ask me how I know this"...

So after I cleaned up the mess it looked like this:


Now I needed to put the crock in a cool, dark place like a root cellar for a few weeks, except that we don't have a root cellar even though I've asked FitzGyver to build one for me ( root cellars, chickens, another puppy... sometimes he can be really stubborn) ... "So I'm using the guest room for a root cellar, FitzGyver, because it's cool and dark in there most of the time and hopefully none of our guests will complain that it smells like garlic and potatoes and fermenting pickles." ...but I digress...

The next step is to check the crock every day and skim off any scum that forms on the top and theoretically I will have deli style dill pickles in about 3 weeks.  I hope so ... I'll keep you posted...


Enjoy!


6/24/12

Oops! One of my readers just pointed out that I never did the update on this post (thanks, Peggy!)
Well, after 3 weeks I rinsed the cukes in fresh water, made up a fresh batch of brine (the first batch became quite cloudy during the fermentation process) and transferred them to a gallon jar which now resides in the refrigerator ...


... and then I started a second batch!  Wow!  These are good!  After the second batch had fermented for 3 weeks I rinsed them and added them to the same mason jar ...


After 10 months they are still crisp!  I still have enough left to get us through the BBQ season (these are GREAT sliced and topping a hamburger) so I figure I'll make 2 more batches when ripe cucumber season rolls around  ... "I DO now know what a ripe cucumber looks like ... quit snickering, Carolyn!"

:)

Thursday, June 14, 2012

Homemade Granola


I have never been able to find a brand of purchased granola that I like.  Either they have too much sugar, too much salt (Why would you put salt in granola anyway?), bad for you oils or GM ingredients (plus assorted other nasty stuff) ...

YUCK!

So ... after perusing multiple recipes I came up with my own ...


Ingredients:
1) 4 Cups Oatmeal (Bob's Red Mill Extra Thick)
2) 1/4 cup Brown Sugar (organic)
3) 1/4 cup Honey (local from the Farmer's Market in Shelton)
4) 3/4 cup Sliced Almonds
5) 1/2 cup Sunflower Kernels
6) 2 tsp Ground Cinnamon
7) 2 tsp Pure vanilla Extract (unfortunately not my homemade ... it's not ready yet)
8) 1/4 cup Coconut Oil (Mountain Rose Organic)
9) 1/2 cup Golden Raisins
10) 1/2 cup Dried Date Pieces (Bob's Red Mill)
11) 1/2 cup Dried cranberries
12) 1/2 cup Dried Apple Bits (Bob's Red Mill)


Preheat the oven to 375 degrees.  Place ingredients 1 - 7 in a large bowl.


Scoop out the coconut oil (which is semi-solid at room temperature), place in a small glass bowl an microwave for one minute on the defrost setting (Careful!  It melts quickly!)


A little bit is still unmelted ... it won't hurt anything ...


Add the coconut oil to the ingredients in the bowl and mix well.  (NOTE!  Do not add the dried fruit yet ... it gets mixed in AFTER the cereal is cooked.  If you add it now it will all become hard as rocks ... ask me how I know this )


Spread the cereal mix on a large baking tray lined with foil.  Bake for 10 minutes.


Stir and turn the cereal and bake for 5 more minutes ... check the cereal again and if it is a nice  golden brown it is done.  You might want to stir it again and bake for 5 more minutes.


Oops!  I let mine bake an extra 5 minutes (a total of 25 minutes ... 20 would have been enough) ... it got just a little too crispy around the edges.  The rest is fine though.


Allow the granola to cool and then mix in the dried fruit.


This is my favorite way of serving it ... over a bowl of my homemade vanilla bean yogurt and drizzled with a little organic agave nectar ... *bliss*

Enjoy!


Wednesday, June 13, 2012

Homemade Vanilla Bean Yogurt

I couldn't believe how easy this is!  Or how creamy and rich it tastes.  There is one down side; since I started making it Mike won't eat the store bought anymore so I have to make a batch every week ...


Before you read my directions I'd like you to read this, written by an expert explaining the importance of the temperatures and keeping everything very clean.  These are the directions I followed and then modified a bit to make vanilla yogurt.


Here are my ingredients:


One half gallon organic whole milk, 1/2 cup organic yogurt starter and organic vanilla beans.
  That's it! Really!!

Here are the step that I added in order to get a good vanilla flavored yogurt ...


Split two vanilla beans and scrape out the seeds.


Pour the milk into a crockpot, add the vanilla beans and seeds cover and cook on low for two hours.  This allows time for the vanilla to infuse into the milk.


While the milk and vanilla beans are infusing get your jars ready.  I use four half pint canning jars.  Place in a water bath (I use the same pot that I am later going to use for scalding the milk), bring to a boil and boil for 10 minutes.


Use a jar lifter to remove the hot jars from the water and set them upside down on a clean towel.  Discard the water in the pot (which is now sterile too after boiling out the jars).


Transfer the milk and vanilla beans into the heavy bottomed Stainless Steel pot.  I repeat; Stainless Steel!  In the next step it is very easy to scorch the milk on the bottom of the pot.  It doesn't really hurt the yogurt unless you really let it burn away, but it can ruin your pot (ask me how I know!).  The only pot that I've been able to get clean again after scorching the milk is my stainless steel stock pot.  After transferring the milk to the pot heat it to about 190 degrees (use a jelly or cheese thermometer) ... I like this one that came with my cheese making kit.


 The milk will start to look "foamy", but not boiling.  While the milk is heating get a cold water bath ready ... either in the sink or in a larger pot ...


I have two stock pots and one fits nicely inside of the other ... a sink works just as well.
Let the milk cool down to 120 degrees.  While it is cooling prepare the picnic cooler ... Crap!  I didn't take a picture of the outside of the cooler!  Well ... it's this one ...


Yes, the same one I use for Taffy's fish (I did wash it out first ;)

Put about four inches of 120 degree water (actually pretty much tap water temperature) in the cooler.  Now prepare the starter culture.  Put 1/2 cup of a good, plain yogurt (I like Nancy's Organic) in a bowl.  When the milk has cooled to 120 degrees take about a cup of it and mix it with the yogurt starter (I'm experimenting to see if I can freeze the starter in 1/2 cup aliquots for later use ... I'll let you know how that comes out) ...


and then pour that back into the pot with the rest of the milk and stir.  Remove the vanilla beans (rinse,dry, and set aside ... we aren't through with these ... but that will be another post :)


Use a clean ladle (I use a stainless steel one that I dunk into the water bath while the jars are sterilizing) to fill the jars and cover with plastic caps.


Place the jars in the cooler and adjust the water level until it comes up to just below the bottom edge of the caps.  Put the lid on the cooler and go away for eight or ten hours (I usually make this in the evening so I can just let it sit overnight).


In the morning the yogurt will have firmed up.


Transfer the jars to the refrigerator and let them chill ...


and after a few hours it will look like this!


Serve with fruit or home made granola (recipe coming soon).

Enjoy!